Food Blog Image Optimization, Organization, and Best Practices.
Photos and images are a huge part of blogging; for food blogs especially, the photo more often than not sells the dish. The question of how to properly optimize, organize, and handle these images isn’t often discussed. Improper image handling can lead to slow load times on your blog, disorganized media libraries with un-searchable images, and not to mention gigs and gigs of raw images cluttering up your hard drive. We’re here to help!
If you publish new content with any regularity, you’ve probably got hundreds of gigs of photos in various phases and formats just sitting on your computer, maybe without much of an organizational system in place. Which, if you’ve tried to go back and locate an older image, might prove to be a tricky task indeed.
Instead, by creating a consistent photo editing workflow, and by observing a few general recommendations and guidelines, you can keep your computer files neat and orderly, as well as ensure your blog meets all current speed and accessibility standards when it comes to photos.
Photo file organization and optimization doesn’t end there, you want to keep up best practices as you upload your images to your blog as well, from properly sizing, entering alt tags, and optimizing the images for optimal pagespeed and performance.
Below are our recommendations and samples of our own personal workflow, to help you better keep your photos organized and your blog running swiftly and up to current speed and accessibility standards. While we primarily use Lightroom for image editing and exporting, I will touch on Photoshop and Canva as well.
Importing Images from Your Camera
Importing Images
On MacOS, the Image Capture utility (Applications > Utilities > Image Capture) is how I bring my images from my camera card to my computer. You can see a preview of all the images on the card, select all or just the ones you want, and then import to a designated folder on your computer.
I like to do it this way so I can organize/rename the image files BEFORE I even bring them into Lightroom.
Organize into folders
By keeping my edited and saved for web images separate, when it comes time to offload my RAW images to an external hard drive I can simply copy over the individual shoot folders, then delete them from my computer, leaving only the edited and web images.
My personal photo organization system looks something like this:

The RAW images (.CR3) are separated out into yearly folders, then subfolders for each recipe shoot. Then I have a separate set of folders for full size edited images (.tif) and images cropped images for web and for instagram, each subdivided into yearly folders as well to keep things current.
Separating out the raw images from the edited images makes it easier for me to offload the originals to an external hard drive (I just drag over the yearly folder with the raw images in it). I can also easily access all my cropped images if I need to use them for an email newsletter, or my full size images should a print publication come calling, for example.
Bulk update file names
Straight out of camera, your images are probably a mess of generic numbered file names like IMG_1234.CR3 or something along those lines.
I use the bulk rename feature to give the images friendly names before I import my images into Lightroom and start editing. Friendly file names will make it easier to search for images later on too!
To bulk update file names on a Mac:
- Select all the images you want to rename (I select all the images from a particular recipe shoot which I have already put in their own folder).
- Right click or control + click, and choose Rename from the dropdown.
- Choose Replace Text from the option menu.
- In the Find field, enter the generic part of the image name you want to get rid of (for me, that’s IMG_). This will find and replace just the generic part of the file name, but leave the numbering structure intact. Your camera may have a different default image naming format than mine.
- In the Replace with field, enter the updated image name. For me, I use the following format:
MM-DD-RecipeName-XXXX.CR2 (The XXXX being the 4 digit number that will be preserved from the original image.)
So:
Original: IMG_1234.CR2
New: 01-02-ChocolateChipCookies-1234.CR2 - Click Rename, and it will bulk apply the find/replace to all of the selected images, while also preserving the original file numbering.


Import to Lightroom
Drag your nicely named and organized images into Lightroom. Your Lightroom catalog should reflect your folder structure and file names, which will help keep it organized there as well.
This isn’t a post about editing in Lightroom, but if you want to learn more about editing images in Lightroom there are plenty of resources and classes out there to help you maximize all the features available!
Clean up and delete duplicates and rejects.
As you go through your photos, mark as Rejected any duplicates or images that are clearly out of focus (just hit X to mark an image as Rejected; conversely P marks an image as Picked, which I use to pin the final photos that I will export). How aggressive you are at culling your images is up to you; I personally like to keep some alternate images that may not make it to the final blog post, just in case I need them down the road (for example, if you want to post a photo to instagram but realize later on that the crop is too tight, if you have a similar image in your library you can always re-edit and re-save that image in the future).
Once you’ve reviewed the images and marked those you don’t want, then go to Photos > Delete Rejected Photos; you’ll get a popup that asks if you want to Delete from Lightroom or Remove from Disk. Choose Remove From Disk to move the raw image files to the trash (Delete from Lightroom just removes the images from the LR catalog, but the files are still on your computer).
Offload RAW images.
RAW images are massive, and they take up a ton of space on a computer hard drive. I typically keep the most recent RAW images on my computer (of posts I am actively working on), but every few months will do a bulk transfer of older RAW images to an external hard drive.
I have a few large capacity hard drives that I use solely for photo storage. I simply copy the yearly folders from my computer to the external hard drive, then delete the originals from my computer. I will copy the edited and cropped versions too, but more as a backup, as I like to keep those on my computer indefinitely for easy access. Obviously that’s up to you and if you have space for it or not.
TIP: When you delete folders of RAW images from your computer, don’t forget to delete the folders from your Lightroom catalog as well (this will keep your catalog running efficiently).
Some people may question whether you even need to save these original RAW files. Definitely remove duplicates and obvious reject shots, but I have had a couple instances where I needed to go back and grab a raw image from a post that was years old (in one case, a print publication paid to reprint one of my recipes and needed a high res file). Having a logical image organization structure in place and files with searchable names made it easy to locate the exact file I needed despite it being 10 years old.
Crop ’till you drop.
Cropping your images to the appropriate size before uploading to wordpress is key to having well-optimized images.
From Lightroom, the cropping/sizing happens at the Export stage. But if you use Photoshop to edit, you’ll do the cropping as you edit the image before you export.
Crop to the proper size
How do you know what size to crop, you ask?
Images should ideally be cropped to 2x the maximum width of your blog’s content. The minimum image size is 1200px (per Google’s recommendations), but most blogs these days are slightly wider, 680-728px is the average size, necessitating 1360-1456px wide images.
- 680px content width = 1360px wide images
- 700px content width = 1400px wide images
- 720px content width = 1440px wide images
- 728px content width = 1456px wide images
Note these are the desired dimensions for the image width. Height will be variable depending on the image proportions.
While the height is technically variable, I recommend keeping your image proportions consistent, which makes for a more professional look and feel in your posts overall. I like to keep my images at the original 2:3 proportions from my camera; but if you prefer slightly shorter 4:5 (instagram’s dimensions) that’s totally fine, just crop all your images to the same proportion.
Exporting Images
Lightroom
Lightroom Classic has an export option for Width and Height. Enter the desired Width, but leave the Height field blank. Resolution should be a straight 72 for web resolution images (the resolution actually doesn’t make a difference in the final pixel size of the image). JPG image format and sRGB color space.

For quality, I recommend choosing a value around 45-65, which I find to be a good balance of quality and file size. If you have a separate preset for instagram, that can have a slightly higher quality (I use 85) ssince pagespeed isn’t a concern on Instagram and I want nice, crisp images.
Take Note: If you notice a color shift when uploading your images into WordPress, double check you are exporting in sRGB.
If you are exporting a group of images from Lightroom, drag and drop and arrange the images in the order you want first, and then export. This will sequence the image numbers in the right order, and they’ll also upload in that same order into wordpress. I usually do two exports, one for the hero images and a second for the process images, all sorted into the right order before I hit Export.
Lightroom Cloud/Mobile
If you are using Lightroom CC or mobile, the export options look a bit different, and you’ll have different settings for vertical vs horizontal images.
Choose your export File Type of JPG, then under Dimension choose Custom.
Horizontal images are easy, with the long side being the desired width, so just enter your desired width in the long side field (1456px for example).
For vertical images, the long side is actually the vertical side, which is going to be a larger number if we want the width to be 1456px. You’ll want to calculate the appropriate width depending on the proportions of your image (2:3 is standard for most DSLR/Mirrorless cameras, compared to iPhones which use 4:3 proportions).
To calculate your image proportions, use an aspect ratio tool. For example, enter 2 and 3 in the ratio width and height fields, then enter your desired width in the pixels width field. The pixels height will be calculated for your (for example, a 1400px wide image will be 2100px tall, 1456px wide would be 2184px tall, etc). This height value is what you’ll enter in the ‘long side’ field in your export settings.


Then you can save the image to your phone’s Photo Library, or choose to save to your Files/iCloud or even Dropbox to easily access on your desktop device.
Photoshop
Lightroom generally exports images at a smaller file size than photoshop does, which is why I prefer it for basic editing. Occasionally I will open up an image if it needs extra retouching (oh hello cat hair) or edits that Lightroom can’t really achieve, and in that case it’s helpful to know how to crop and export from Photoshop as well.
The main difference between cropping in Lightroom and Photoshop is Lightroom sizes during the Export stage, and Photoshop it happens during the Edit phase prior to export. You can use the Crop tool or the Image Size setting to do this (the Crop tool will allow you to selectively crop what you want; Image Size just resizes the full image to the desired size and resolution).


Right click and choose Open in Photoshop to open your Lightroom photo directly into Photoshop. You can also select two or more images and choose Open as Layers in Photoshop and they will open in a single canvas with each photo as a separate layer (useful for blending images or making collages).
If you simply Save the image from Photoshop (File > Save or Command + S), it will automatically save a .TIFF version of the image in the original location. This should automatically show up in your Lightroom album, in which case you can export it from Lightroom using the same settings as your other images.
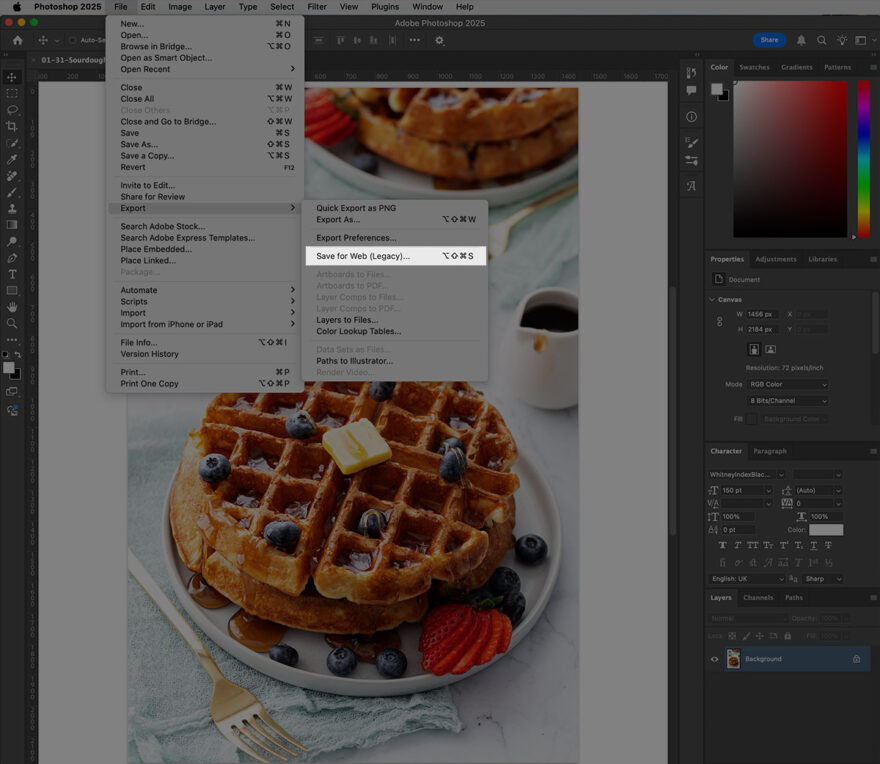

To export an image from Photoshop itself, choose File > Save for Web (Legacy), or File > Export As. Choose JPG as your file format (when saving for web you should rarely, if ever, need to save as PNG; which would lead to much higher file sizes). I prefer the Legacy Save for Web, but the regular Export As works as well.
Play with the Quality settings until you’re happy with the balance of quality to file size (I find 45-65 to be my sweet spot in the Legacy Save for Web, or 3-4 in the Export As window).
Pro Tip: photographs should never be saved as PNGs unless you need specific features like transparency. Photos saved in PNG format are abnormally large and not efficient for pagespeed. If you have screenshots or other images that come in PNG format, convert and save for web as a JPG before uploading.
The Save for Web option in photoshop creates web-ready images that are much more optimized than standard JPG saves. Use the standard save for higher quality images only as needed (for cookbook images for example, which I would save at the highest quality/resolution possible), or something like a printed business card, or if you were sending a photo to a magazine for print use. But generally, most of your images will be used on the web in which case the Save for Web option is preferrable.
Free Image Editors
While Photoshop and Lightroom are the most widely used photo editors, if you don’t want to pay for the license, there are a number of free options that will give you basic editing tools and can crop/save your images.
- Photoshop Express – a free version of photoshop for mobile, a great option if you want to edit/crop on your phone.
- Affinity – a free desktop app for Mac and Windows. The “Pixel” space is a stellar photoshop alternative (“Vector” would be the Illustrator equivalent, and “Layout” InDesign if that interests you). If Adobe disappeared tomorrow, this would be our editor of choice. There is a “pro” version with expanded AI tools, but they are entirely unnecessary.
- Photopea – a browser-based photo editor with a Photoshop-like interface. Probably a bit clunky for more advanced editing, but if you just need to crop/save your images it works just fine.
- Adobe Express – Not to be confused with Photoshop Express, AE is basically the Adobe version of Canva: a browser-based graphics editor. It definitely has more of a graphics focus than photo editing, and for that reason it’s not my favorite option. There aren’t a ton of export options (like quality/etc) so the image file sizes are on the large side. There is a Free version as well as a paid version with additional (and totally unnecessary) AI tools.
Canva is not our favorite tool for image editing/cropping purposes; it is more suited to designing graphics like custom Pinterest pins with text and the like. That said, it is possible to create a new canvas in the pixel size you need, or to resize a photo to a specific pixel size during export, but the file sizes are often on the large side even when exported as JPG.)
Note that many free photo editor tools, especially those geared more towards graphic work than photo editing like Canva and Adobe Express, default to PNG as their export format. For straight photographs, always choose JPG as the image format as PNG photos will be extremely large. PNG is more suited towards text-based graphics.
Quality and File Size
We’ve talked a lot about pixel dimensions, but what about file size (referring the amount of storage space or number of bytes the image uses). For web images you’ll be working in kilobytes or KBs (if you’re seeing MBs you should revisit your export settings/quality).
Some people try to have a ‘goal’ or ‘limit’ for their image file sizes, claiming web images should be no more than 200KB in size or some such. The problem is that images can vary greatly in their file size depending on the pixel data of that actual image. For example, compare the two images below:


The image on the left has a lot going on. Lots of high contrast areas, objects and detailed textures means a lot of pixels. This image, saved from Lightroom at 65 quality, is 685KB in size.
Meanwhile the image on the right is much simpler, with a clean white background with little variation, and not a ton of contrast or texture in the subject. Exported with the exact same settings as the other image, this image is only 157KB in size.
See what I mean? If your goal is to try to have all your images under 200KB, that strawberry jam photo will need to be saved at a much lower quality, and that’s a quality difference you will notice in your final web-ready images.
So rather than shoot for a specific file size, I recommend finding a quality setting that works for you. Play with the sliders in Lightroom or Photoshop until you find a balance of quality versus size. I usually recommend somewhere in the 45-65 range. But if you find you can go lower and the images still look fine to you, then go for it! You can then save this setting (along with the proper crop size and naming convention) as a preset and use it to export all your blog images going forward.
To create a Lightroom preset, in the Export window, get all your settings to where you want them to be in terms of file settings, quality settings, as well as image location and file naming (refer to my screenshot above if you want to match the settings I use). Then in the lower left, click Add to add a new preset, and call it whatever you’d like (I have “Blog” and “IG” presets saved). Then in the future you can choose this preset in the Export window and all the settings will pre-populate; just change the file name, then choose the location when you hit Export.
Image Naming Conventions
Rather than leaving your images named IMG_1234.jpg or what random name your camera assigns them, I recommend changing the file names to friendly ones. If you’ve bulk renamed the images as you pull them off your camera, they’ll already have a somewhat more friendly name than they started with, and you can certainly keep those same names for your web versions.
I like to simplify the file names even more, however, removing the dates and original file numbers. Additionally, while I do use camel case (ex: ChocolateChipCookies.jpg) in my original file names, I tend to prefer all lowercase in my web image names as web images are case sensitive (so chocolate-chip-cookies.jpg).
Pro Tip: Web file names should never have spaces. Instead, use dashes (-) or underscores (_) instead.
The purpose of using friendly names is twofold: one, it makes organization on your computer easier (looking for that pumpkin waffle photo from 3 years ago? Just type ‘pumpkin’ in your search and any files with pumpkin in the name should pop up. The same is true after uploading the cropped images to WordPress, you can search the media library for ‘pumpkin’ and easily find what you’re looking for.
Friendly file names also help with SEO, particularly google image search. I recommend using names consistent with the SEO title of your recipe for that reason (but still keep it somewhat short and don’t keyword stuff).
Examples of bad file names: img_1222.jpg, kakfj3139fnj4r_2b.jpg, or chocolate chip cookies 12.jpg.
Examples of good file names: pumpkin-donut-waffles-2.jpg, no_bake_cheesecake1.jpg, or chocolate-chip-cookie-process-12.jpg.
I give all the hero images for the same post/recipe the same file name for the most part, adding sequential numbers for multiple images, and append “-process” or “-how-to” to differentiate step by step images so I can more easily see which images are process photos and which are final hero shots. The sequence number also helps me more easily keep my process shots in the right order (assuming your images were in the right sequence when you exported).
Same for an optional horizontal or square image, if you have one. My blog layout uses a horizontal image in the header, so I save a single horizontal image for each post, which I include “-feat” or “-horiz” or even just “-H” in the file name. This is mainly for my own reference, there is no technical or SEO reason for this. Just use whatever labeling structure works best for you and how you organize your posts and photos.
Further Optimize with ImageOptim
I perform a pre-optimization using the ImageOptin application on my computer, after exporting from Lightroom and before uploading to WordPress. From Lightroom this usually saves me an additional 10-20%, sometimes more, without any noticeable quality loss.


After optimizing, you can see I saved 11-12% on most images without any noticeable quality loss.
Running images through ImageOptim is as easy as dragging and dropping your images from your finder window into the application. The green check means the image is successfully processed, and you’ll see the % savings in the right column. The images are now ready to upload to wordpress!
Additional Image Optimization Plugins
Adding an additional level of optimization after the image is uploaded to WordPress can see some additional savings. I still advise optimizing your images as much as possible BEFORE uploading to wordpress, but a plugin can optimize even further.
Imagify and Shortpixel are the two most widely used image optimization plugins. Both are paid plugins with limited Free versions, but you can tailor your subscription level to the number of images or credits you need per month.
Uploading & Inserting into WordPress
Upload images into the post you are working on, rather than the site-wide Media Library (so from within a post, add a new Image or Gallery block and upload there). This will ensure the images are ‘attached’ to the specific post, which just keeps things more organized.
To upload/add an image, click + Add Block, choose or type Image, then instead of choosing Upload or just dragging in a single image, click Media Library to open up the media library modal window. Drag and drop ALL your images into the media library at once, and click through and populate the alt tags for all the images. While the Block editor won’t allow you to insert multiple images at once (see below for a workaround), it will save the info you enter here so when you insert each image into the post it will populate the alt tag you entered into the media library.
Try to get in the habit of entering alt tags as you upload, that way you don’t forget to do it later (alt tags are always required unless the image is purely decorative).
Additionally, when alt tags are entered into the media library, they are saved there, and will populate when the image is inserted into the post, or any other post. On the other hand, if you just entered alt tags individually on images already inserted into a post, this only adds the alt tag to the image in the individual post, but does not save it to the image in the media library. This means that if that image is inserted into another post, or set as a featured image for example, the alt tag would not carry over to those instances since the alt tag is not actually present in the media library, just the one post.

While alt tags are required in almost all circumstances, the title, description, and caption fields, however, are optional and not always needed.
- Captions can be useful, like if you need to add a photo credit. Or if images are used within a gallery, like step by step photos, the captions can describe what’s happening in each step (example part way down this post). Captions can be entered when you upload the images or when you insert the gallery into a post.
- The Title and Description fields aren’t really used anywhere within wordpress (exception would be if you had attachment pages or lightbox galleries which most food blogs do not). I usually just put the title of the recipe/post within the Title field (for the purposes of organization and searching within the media library).
- Certain social share plugins may add additional image fields like Pinterest Description; feel free to populate those on an as-needed basis.
Insert the FULL SIZE image into your post. Not Large, and do not enter any custom image sizes. This will allow the image to fill the content space, and for wordpress to ‘responsively’ load the correct image size depending on the device being used (desktop, tablet, phone, etc).
Inserting Multiple Images at Once
With the wordpress block editor, you can only insert one image at a time (the old Classic editor it was possible to insert multiple images at once). If you have a lot of images in your post, this might get tedious.
If you want to insert multiple images at once, try this workaround trick:
- Add a new Gallery block.
- Upload your images into the Media Library modal window by dragging and dropping the whole set of images from your finder.
- Add image titles/alt tags.
- Select all the images you want to insert (sometimes they may get deselected as you click through and set alt tags).
- Click “Create a New Gallery”.
- Rearrange photos if you want, then click “Insert Gallery”. The gallery will be inserted into the post using the default settings.
- Select the Gallery block in the post (be sure you are selecting the whole Gallery and not just a single Image within it); in the Gallery block options in the right sidebar, Choose Columns: 1, and Size: Full, which will convert the multi-column gallery to a single column displaying the full size images.
- With the Gallery still selected, click the leftmost button the toolbar to select the parent, then again to Transform > select Image from the dropdown.
- The gallery will then become individual image blocks. Voila! You can then rearrange the images within your post to appear where you want them to.


Adding a Process Image Gallery
A Gallery block is a great way to show multiple process images in a more compact space. I often use 2 or 3 column Galleries in my posts to display process images, with concise caption text that adds a great opportunity for natural language processing (search engine speak for helping machines understand language more like humans do).


Note the default Gallery captions aren’t the prettiest or most legible, with the text in white on a shaded overlay on top of the image that often makes it hard to read. If you want to customize the appearance of gallery captions, please reach out to your designer or a developer.
Alt Tags are NOT optional.
The alt, or ‘alternative’ tag, is what shows up as text when an image fails to load. It’s also the text used by screen readers to describe what is going on in an image for visually impaired users. It’s this latter reason why alt tags are critical for accessibility.
Technically, any image that is not solely decorative (just as a graphic ornament used to separate text, for example) needs to have an alt tag.
Do you need an image Title? Generally no. The alt tag is the most important. By default the Title field will inherit the name of the image. I usually just paste in the friendly name of the recipe (spaces are ok, and fine if all your images have the same title). Mainly for admin search purposes (if I’m searching in my media library the Title field is included in that search). But most sites/themes do not actually output the title in the image block code. Same for the description field, I usually leave this blank.
What about captions? Unlike Alt tags, captions are optional. They can be useful, like if you need to add photo credit. Or if images are used within a gallery, like step by step photos, the captions can describe what’s happening in each step (here’s a live example of a gallery with captions, scroll down part way). In this case captions can be entered when you insert the gallery into a post, it doesn’t have to be added when the image is uploaded.
Alt Tag Best Practices
Best practices for alt tags are to describing what is in the image in full sentences (with periods).
Keep it short and sweet, but descriptive. Generally no longer than 125 characters in length is recommended.
Be specific. You’re describing the photo to someone who can’t see it. What is the subject of the photo? What’s in the background? What general characteristics does it have? What dishware/props/backgrounds are used? What perspective/point of view (closeup, overhead, etc)? Any prominent colors, textures, or features? Are there hands or people or some other sort of action happening?
Don’t use the same alt tag for all your images. Describing the differences between photos is often a good way to decide what to put in your alt tag. Is it an overhead shot, maybe there’s a bite taken out of the dish, is it an action or process shot, or are there raw ingredients in the photo? Take the time to give each image a unique alt tag to better help your visually impaired readers know what others are seeing.
Food for thought: If you find yourself describing all your images with the same exact descriptions, maybe all those images aren’t even necessary?
Don’t use ‘image of’ or ‘picture of’. Screen readers already do this for any <img> element. Just go straight into your description, ie: “Stack of cookies” instead of “Picture of a stack of cookies”. See the difference?
Don’t keyword stuff. If it makes sense to use a keyword in the context of the image alt tag, you can do so, but just remember that the primary function of alt text is for screen readers. Imagine being a visually impaired user using a screen reader, and having it read aloud the alt tags of multiple images with the same long, keyword-stuffed descriptions. It would be downright maddening, right?
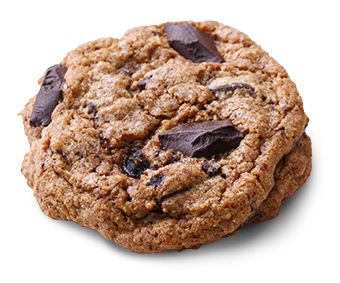
For example “best pumpkin waffles easy overnight waffles recipe gluten-free breakfast recipe idea brunch recipe” is a very bad alt tag. Instead something like “Stack of three gluten-free pumpkin waffles on a white plate with a fork.” is much better. You still get one instance of the keyword in there (gluten-free pumpkin waffles), but it also does it a good job of describing what is actually pictured.
Use proper capitalization and punctuation. Alt tags should be complete, capitalized and punctuated sentences so the screen reader outputs actually make sense.
Don’t use alt text for Pinterest captions. In the absence of a pin description, Pinterest will use an image’s alt tag as the description text. Before pin descriptions were widely used, bloggers regularly added catchy, keyword-rich and hashtag-heavy descriptions to their image alt tags. This is very bad news for accessibility. Imagine having to listen to the alt tag of an image read to you… “The best easy pumpkin waffles are delicious and nutritious! #recipe #waffle #breakfast #pumpkin #pumpkinseason #psl #blessed from @janedough www.janedoughskitchen.com“. See what I mean? Keep the pin descriptions limited to the pin description box (if you have a social share or pinterest plugin it will likely add this field for you).
Fixing Old Images
If you’re just getting started blogging, following the guidelines and recommendations in this post will put you on the right track!
But if you’ve been blogging now for a while, maybe you’ve been uploading images straight from your phone or camera without cropping or optimizing them. In that case, what can be done to retroactively optimize your images?
Definitely add an optimization plugin like ShortPixel or Imagify, first and foremost. You can run bulk optimizations with both of these plugins that will optimize images that already exist in your media library.
That said, if you’ve been uploading a full size, straight-out-of-camera image, optimizing can only do so much for you. If the image is extremely large to begin with, and those images are a little trickier to deal with.
Think of it this way: an image optimization plugin will likely reclaim 20-30% of the file size. So a 100KB image might shrink to 70KB, but a 1000KB image only shrinks to 700KB. You’ve still optimized 30%, but a 700KB image is still on the large side and will likely adversely affect pagespeeds.
Search for scaled images.
In your media library, do a search for “scaled”. If you see any images show up for that search, that means you’ve uploaded some very large images to your site in the past. If you see most or all of your images show up, you’ve definitely got a bit more work to do (sorry!)
Images with ‘scaled’ in the file name are wordpress’ way of handling of large images; by default if an image is more than 2048px in size wordpress will create a scaled version of that image; the original is still on the server, but the smaller scaled version is used in posts.
I personally do not love WordPress’ scaled image handling and usually disable it entirely (if you’re cropping/saving your images properly to begin with, it’s not necessary). If a client has a lot of these images, then I have a bit of a funky workaround to remove, resize, and resolve them.
There are some quirks with scaled images, for example if you ever need to complete a thumbnail rebuild (if you redesign and have new image sizes used on the homepage, for example). These issues are very strange and I’ve yet to find an easy solution. That said, I do have a workaround for our clients and can help resolve the issues if/when we work with you on your site and need to run a rebuild (it’s a multi-step process involving a database search/replace to remove all mention of scaled images, then running a plugin called Imsanity to size down these large pixel dimensions, and then running the thumbnail rebuild).
Some plugins like Shortpixel have a large image resize feature, and can size down images in the media library above a certain dimension. Imsanity is another plugin that can do a bulk resize of large images, again, above a certain dimension which you can specify, then run a bulk optimization for large images in your library.
Final Image Checklist
With that extremely lengthy post, I hope you find it useful, and bravo if you’ve made it this far!
- Is your web-ready image cropped to the appropriate pixel size?
- Is it saved for web as a JPG with a user and seo- friendly name (no spaces)?
- Is your image optimized (either through ImageOptim and/or with a wordpress plugin)?
- Did you enter an alt tag when you uploaded the image to WordPress?
- When you finished editing, did you delete duplicates, out-of-focus images, and rejected shots from your Lightroom catalog AND desktop?